 PARP Research Group
| PARP Research Group |
Universidad de Murcia |
QVDefaultGUI Class Reference
| ||||||||||||||||||||||||||||||||||||||||||
Public Member Functions | |
| QVDefaultGUI (QWidget *parent=0) | |
| Constructs a QVDefaultGUI object. | |
Main user interface widget for QVision applications.
Class QVDefaultGUI is used in QVision applications to create a default GUI that offers the user the possibility to control the execution of the different blocks registered in the application, the flow of the input video camera objects, and modify the input parameters defined in them (and which are not linked to the output of other blocks, in whose case they obviously should not be controlled directly by the user).
A single instance object of the QVDefaultGUI class should be created right after the QVApplication object in the main function, and before the call to exec():
int main(int argc, char *argv[])
    {
    QVApplication app(argc, argv,
        "Example program for QVision library. Obtains several features from input video frames."
        );

    QVDefaultGUI interface;

    [...]

    return app.exec();
    }
The following screenshot shows the main QVDefaultGUI for a QVision example application:
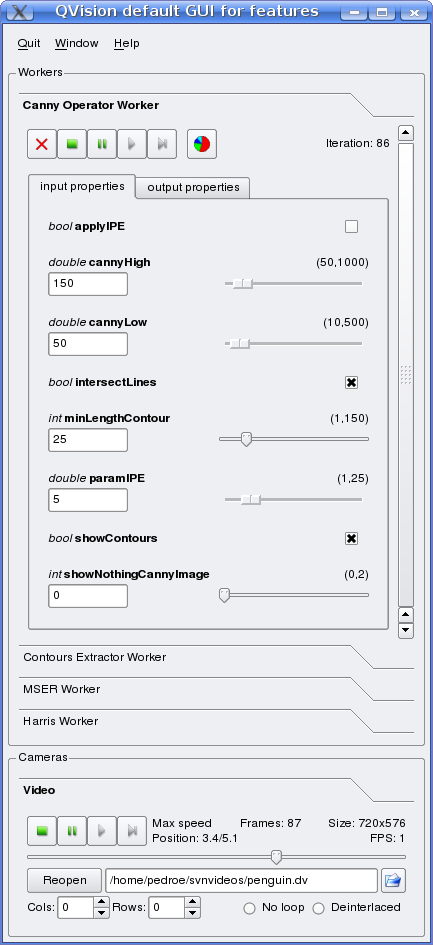
There are three main widget areas in the QVDefaultGUI window:
Contains the Quit, Window and Help options. The first one, naturally, quits the application. The second is a typical window menu that allows the user to show/hide all the windows of the application. Finally, the last one shows a descriptive help of the application, as defined by the programmer when declaring the main QVApplication object and the help text corresponding to the properties of the involved blocks. For example, here is the help window which is shown for an example application which contains, among some others, a Canny Operator Block:
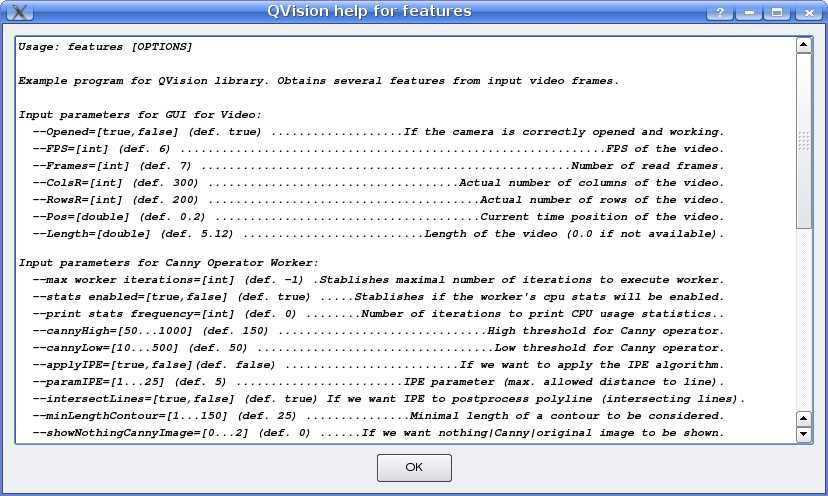
And here is some of the code responsible for the information shown:
[...]

class QVCannyEdgeDetector: public QVProcessingBlock
    {
    QVCannyEdgeDetector(QString name): QVProcessingBlock(name)
        {
        addProperty<double>("cannyHigh", inputFlag, 150, "High threshold for Canny operator", 50, 1000);
        addProperty<double>("cannyLow", inputFlag, 50, "Low threshold for Canny operator", 10, 500);
        addProperty<bool>("applyIPE", inputFlag, FALSE, "If we want to apply the IPE algorithm");
        addProperty<double>("paramIPE", inputFlag, 5.0, "IPE parameter (max. allowed distance to line)", 1.0, 25.0);
        addProperty<bool>("intersectLines", inputFlag, TRUE, "If we want IPE to postprocess polyline (intersecting lines)");
        addProperty<int>("minLengthContour", inputFlag, 25, "Minimal length of a contour to be considered", 1, 150);
        addProperty<int>("showNothingCannyImage", inputFlag, 0, "If we want nothing|Canny|original image to be shown",0,2);
        addProperty<bool>("showContours", inputFlag, TRUE, "If we want contours to be shown");

        addProperty< QVImage<uChar,1> >("Output image", outputFlag);
        addProperty< QVImage<uChar,3> >("Input image", inputFlag|outputFlag);
        addProperty< QList<QVPolyline> >("Output contours", outputFlag);
        }

    [...]

    }

int main(int argc, char *argv[])
    {
    QVApplication app(argc, argv,
        "Example program for QVision library. Obtains several features from input video frames."
        );
    [...]

    QVCannyEdgeDetector cannyBlock("Canny Operator Block");

    [...]

    QVMPlayerCamera camera("Video");

    [...]

    }
Several important facts should be noted here:
This area contains a tabbed widget for every block in our application. By selecting the adequate tab, we can access to both input and output parameters of the selected block. Each of these widgets is connected to a corresponding property of the block (only if they are not linked to other blocks, of course). The user can thus modify the values of every unlinked input parameter at will in execution time.
The QVDefaultGUI object literally discover every dynamic property contained in each block object (thanks to the self introspection technique), and conveniently offer the adequate widget (slider, button, checkbox, edit widget, or a combination of them) to the user to inspect and modify their corresponding values at execution time (as well as through the command line, during the initialization of the application). QVision has predefined widgets for dynamic properties of common basic types, such as boolean, integer, double, character string, etc.
The developer of a block class, then, just has to take care of declaring the parameters of the algorithms he wants to be modificable by the user at execution time as dynamic properties contained in the block object, of the input type (declaring them using the InputFlag flag). The introspection mechanism takes care of all the rest. Take, for example, the constructor of the following Canny edge detector block:
[...]

class QVCannyEdgeDetector: public QVProcessingBlock
    {
    public:
        QVCannyEdgeDetector(QString name): QVProcessingBlock(name)
            {
            addProperty<double>("cannyHigh", inputFlag, 150, "High threshold for Canny operator", 50, 1000);
            addProperty<double>("cannyLow", inputFlag, 50, "Low threshold for Canny operator", 10, 500);
            [...]
            }

        void iterate()
            {
            [...]
            }
    }
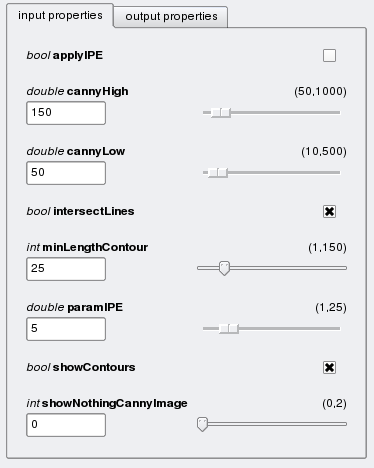
Observe that two double input properties are declared. Let us concentrate on the first one. It needs a name ("cannyHigh"), the aforementioned inputFlag flag (which declares it as an input parameter for the block), a default value (150), a short description, and an interval for valid values ([50,1000]). With just this property declaration in the constructor of the block, the default GUI generated by QVision will generate an adequate input widget that will allow the user to dynamically change the property value during execution. There are also default input widgets for int, bool and Qstring types. See, for example, the following snapshot, corresponding to a QVision application with a Canny block, which contains several input properties of bool, int, and double types:
Once the input properties of each block have been conveniently declared in the corresponding constructors, input widgets will be created automatically by simple declaration of a QVDefaultGUI instance in the main function.
In the tab of each block, there is also a control area, which allows us to pause, resume, and stop the execution for the block, as well as accessing to a time statistics widget.
Here is a list with the detailed description of the buttons and their functionality:
| Pause button | 
| This button suspends the processing of the block. Every block synchronized with it will be stopped as well, until the resume button is pushed. |
| Resume button | 
| If the block is paused, pushing this button resumes its execution. |
| Step button | 
| This button can be pushed when a block is paused to make it iterate just once again (i.e., it executes a complete iteration and pauses again). |
| Stop button | 
| This button finishes the processing of the block. Its properties will be automatically unlinked and frozen, so any block connected to them will keep on reading the same (frozen) values from then on. |
| CPU statistics button | 
| This button opens a detailed cpu usage plot for the block. It opens a window displaying the cpu time statistical plot of the time flags defined in the iterate() function of the block. You can see an example of this plot and how to set up time flags for performance inspection in section TimeFlags below. |
Analogous to the blocks area, this is another tabbed widget with a tab for each camera declared in the QVision application (in fact, internally they are just special kind of blocks). Here we can pause, resume, and stop the video input flow, as well as reopening the source (video file, camera, or whatever) changing the desired parameters (size, deinterlacing or whatever).
Here is a description of the main camera control buttons and their functionality:
| Pause button |
| This button stops the camera from "publishing" new frames from the video source (if the camera is on real-time mode it will keep reading frames, but won't send them to the blocks connected to it; for video files and non-realtime mode, the video will be effectively paused; in any case, connected blocks will keep on receiving the same paused frame). |
| Resume button |
| This button resumes grabbing. |
| Step button |
| When the camera is paused, this button makes it read the next frame in the video input, keeping the camera paused afterwards. |
| Stop button |
| This button stops the camera from reading frames from the input source. The camera must be reopened to work again. |
Here is an screenshot of the camera widget interface:
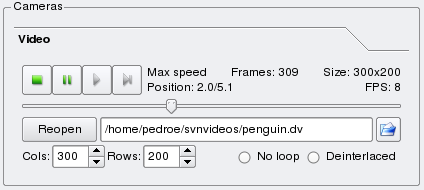
Observe that you can easily change the input video source at execution time, by reopening it with the new desired URL, size and features (deinterlacing and loop mode). The widget also provides some pieces of information on the video source, such as the current position, video size and FPS. Finally, and of course just for video files, the user can also use the position slider to directly move the video source to a desired time position.
Definition at line 212 of file qvdefaultgui.h.
| QVDefaultGUI::QVDefaultGUI | ( | QWidget * | parent = 0 |
) |
Constructs a QVDefaultGUI object.
| parent | (Optional) parent for the created widget |
Definition at line 42 of file qvdefaultgui.cpp.